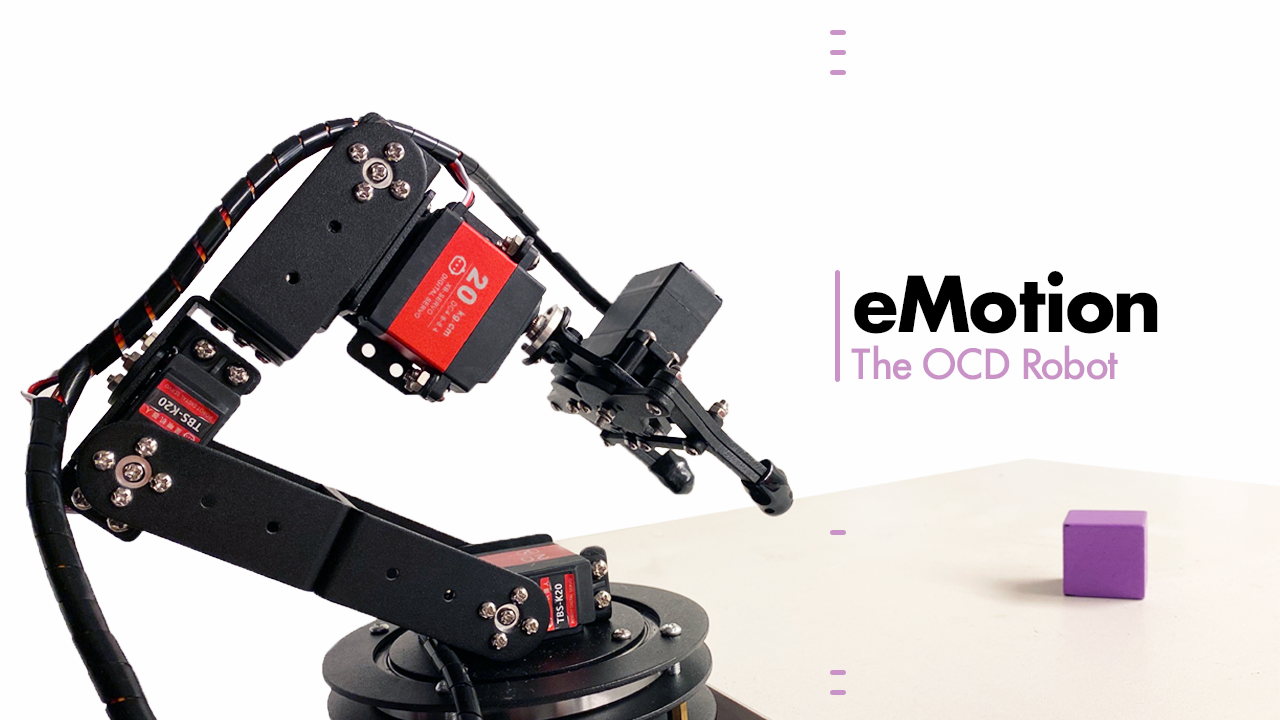
Final: eMotion: The OCD Robot
Initial idea
This project started as an OCD robot that always wants to align things perfectly. I had two ideas for achieving the goal. The first is using a linear actuator, and the other one is the solution I’m using for this final result, a robot arm assembly with servo motors.
The idea also evolved from an OCD robot to an emotional robot guarding a block of a cube. The robot tirelessly moves the block back to where it was supposed to be. However, the robot gets annoyed when it needs to move the block back too many times, and it will start doing crazy things. Like smashing the block.
Physical Part: The Robot Arm
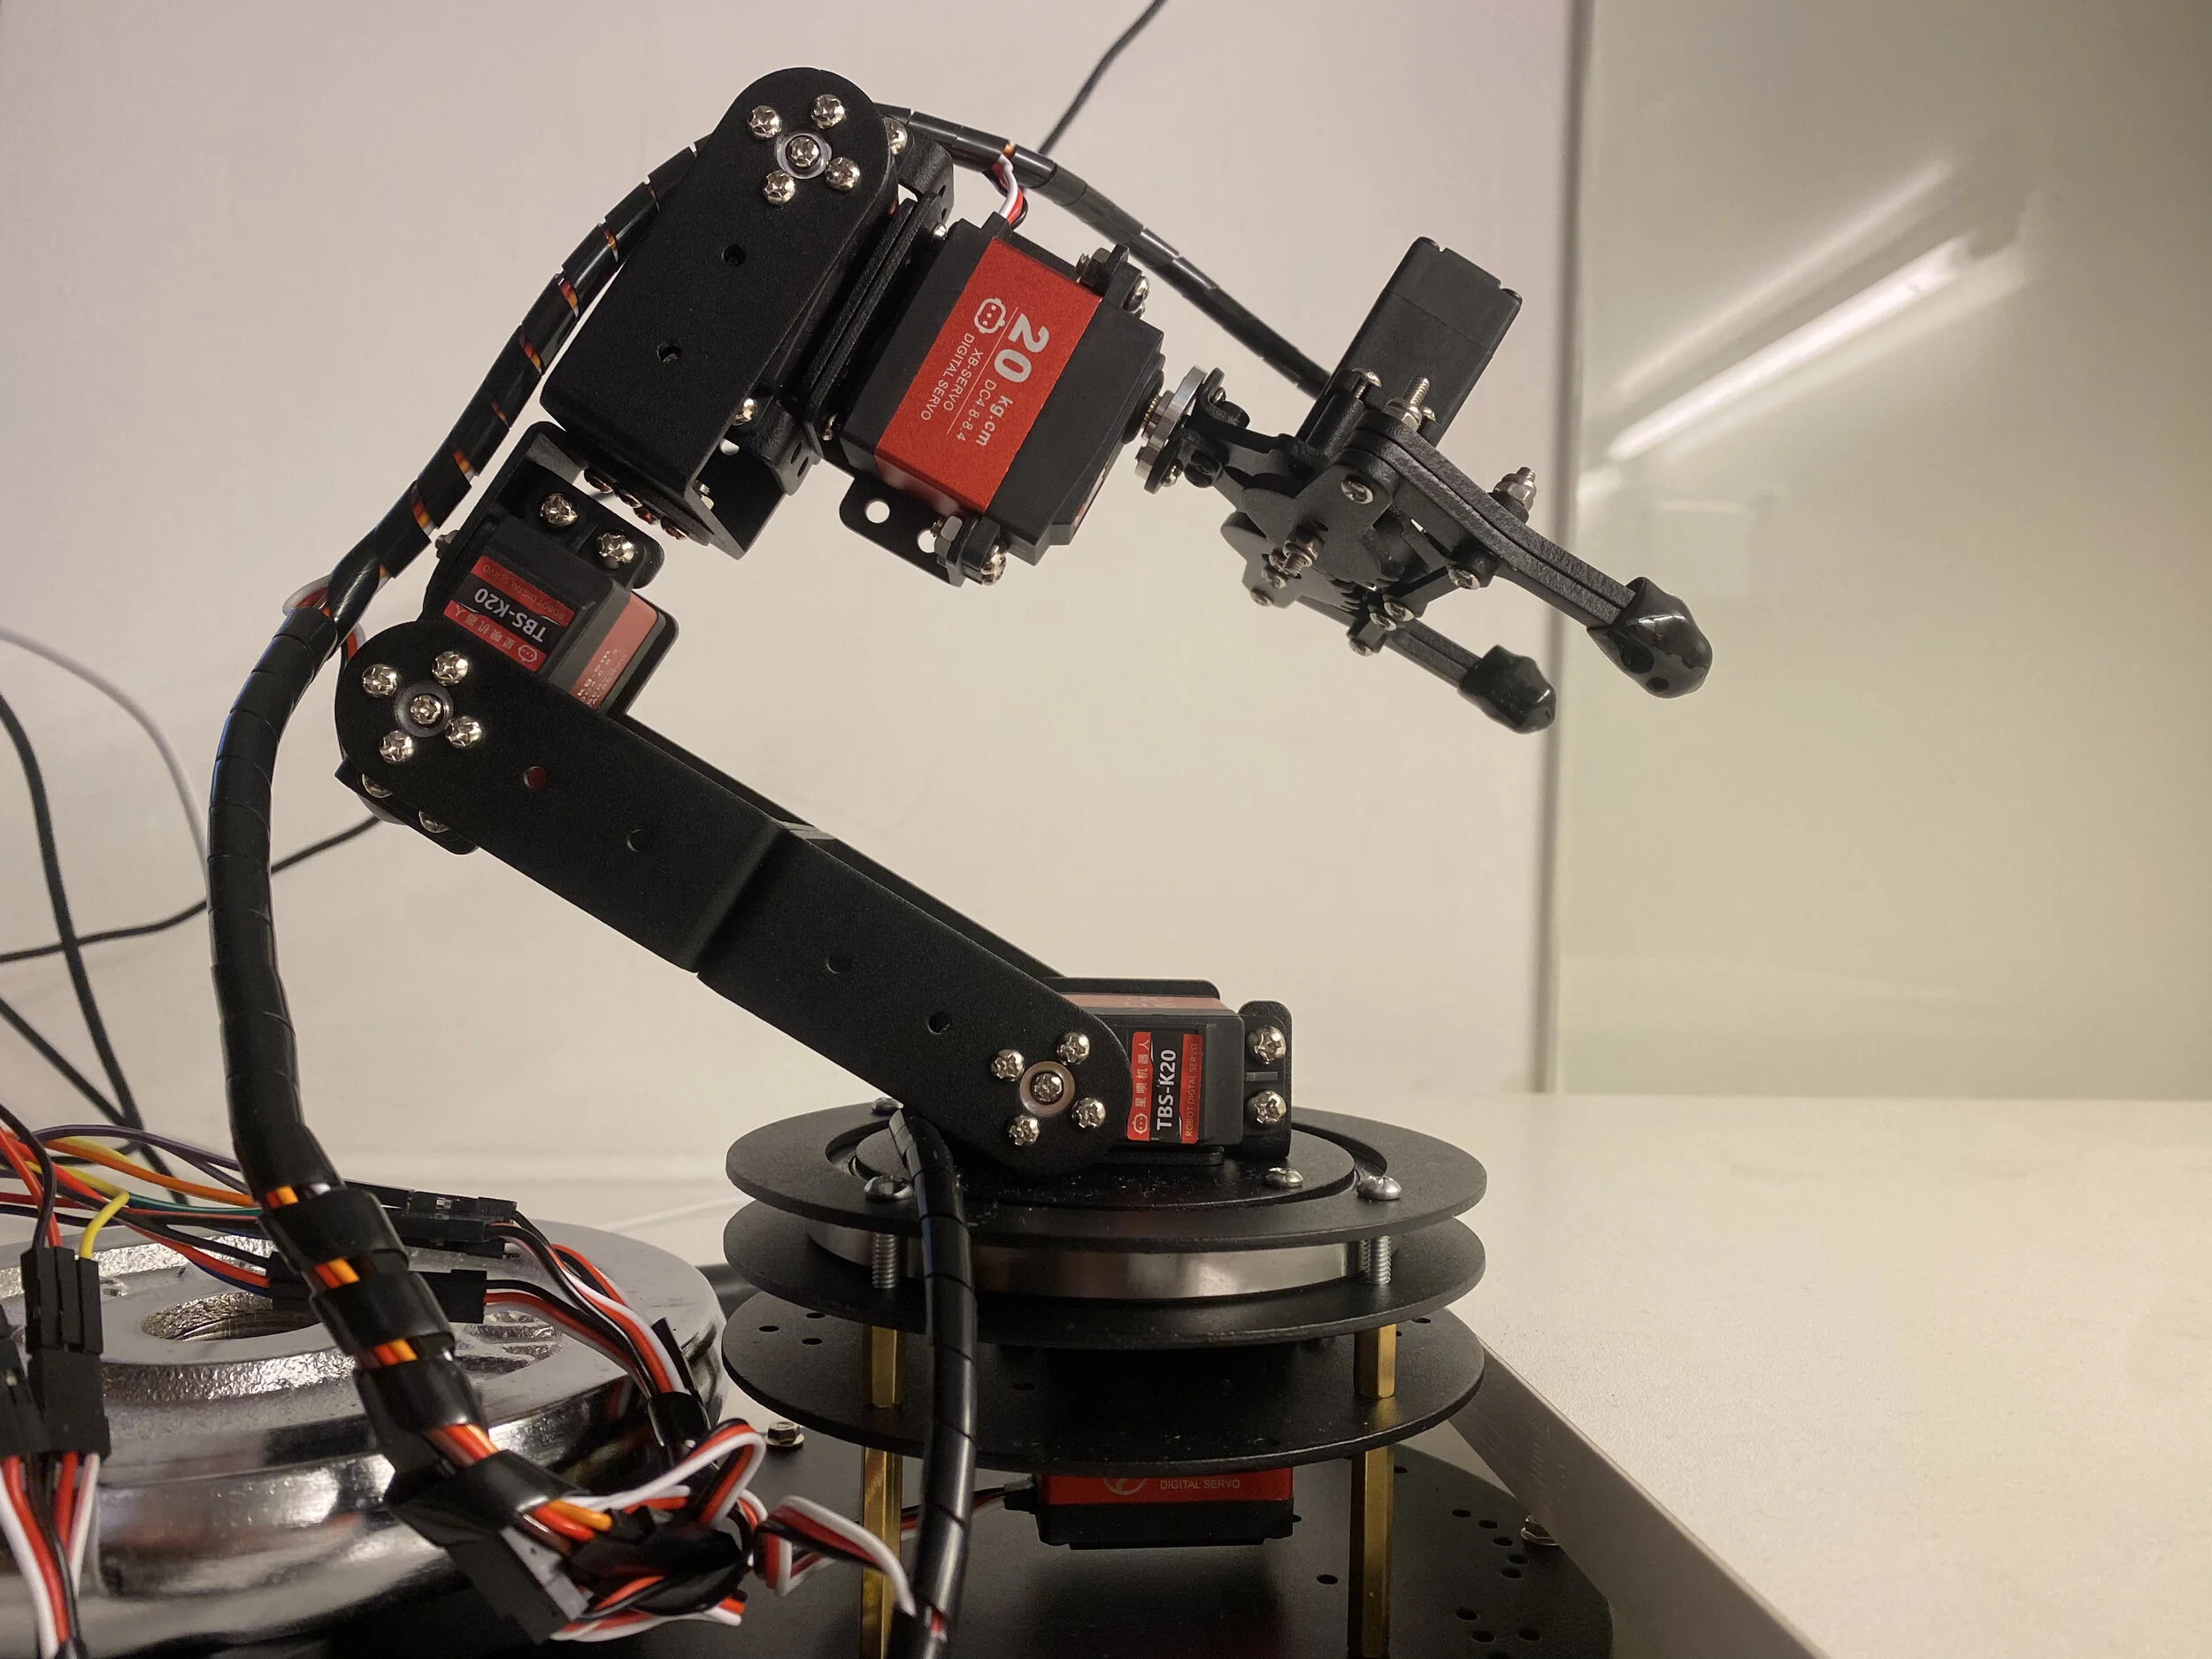
I found a pre-assembled robot online that came with very basic servo motor codes and visual programming software that failed to run on my mac. Unfortunately, ten minutes after I plugged in the robot and loaded the wrong code to the board, the robot broke the board. Looking at the bright side, I could fully understand the control of each servo to program movements as I desired.
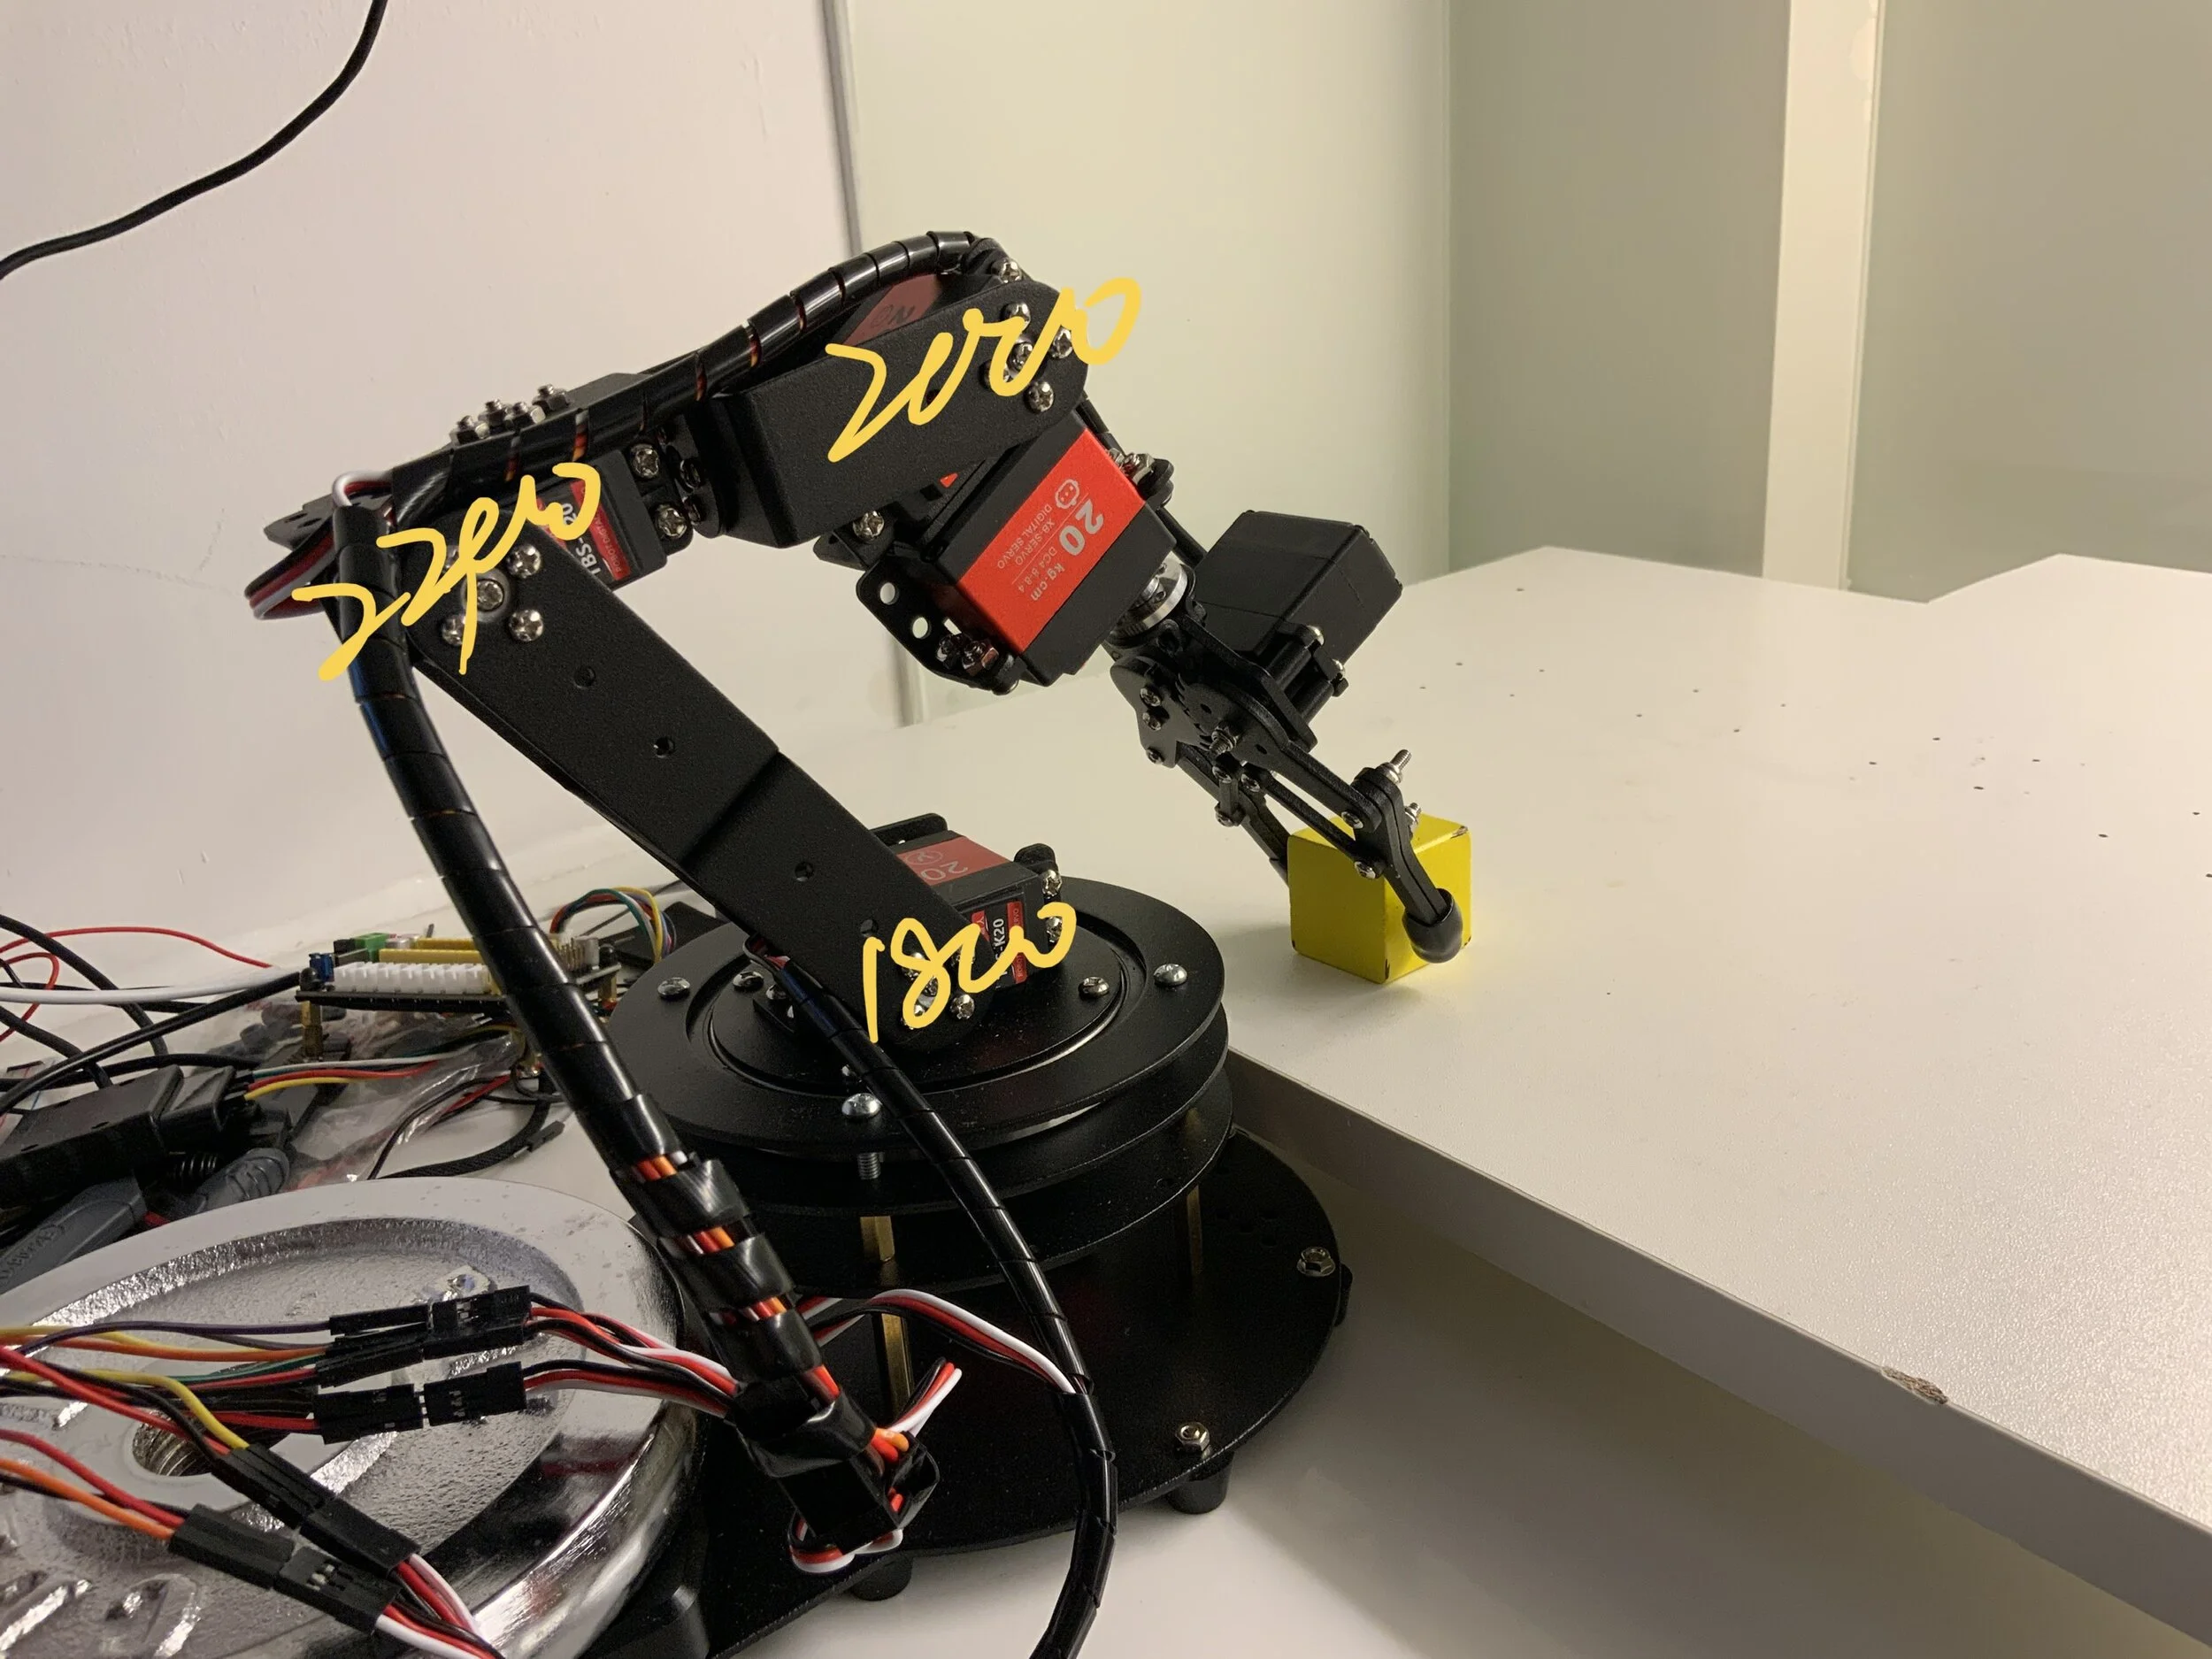
There are six servo motors—one at the base of the robot, rotating the arm, three servos rotate joints, one on the top turns the claw to different angles, and the last one opens and closes the grabbing claw.
I’m using writeMicroseconds() to control the servo, and the value ranges from 500 to 2500. Using simple serial input, I tested out the limits of each joint and which direction they move the arm with what inputs. Here is a sketch I draw during the test.

On the Arduino coding side. ( This is referenced with the basic servo control code that came with the robot arm )
Each servo stores four values controlling movements. They are cur (current location), aim (aimed location), inc (increment), and time (time taken from A to B). It calculates the difference between the cur and aim and divided by time to get inc. So by changing the time, I control the speed of the movement.
void servo_run(int index, int aim, int time) {
  //Setting different limits for each servo
  if (index < SERVO_NUM && (aim <= 2500) && (aim >= 500) && (time < 10000)) {
    if (servo_data[index].cur == aim) {
      aim = aim + 0.0077;
    }
    if (index == 0 || index == 3 || index == 4) {
      if (aim > 2200)  aim = 2200;
      if (aim < 800)   aim = 800;
    } else if (index == 1 ) {
      if (aim > 2490)  aim = 2490;
      if (aim < 510)   aim = 510;
    } else if ( index == 2 ) {
      if (aim > 2200)  aim = 2200;
      if (aim < 600)   aim = 600;
    } else {
      if (aim > 2200)  aim = 2200;
      if (aim < 1000)    aim = 1000;
    }

//Updating aim, cur and time
    if (time < 20) {
      servo_data[index].aim = aim;
      servo_data[index].cur = aim;
      servo_data[index].inc = 0;
    } else {
      servo_data[index].aim = aim;
      servo_data[index].time = time;
      servo_data[index].inc = (servo_data[index].aim - servo_data[index].cur) / (servo_data[index].time / 20.000);
    }
  }
}
int movingSpeed = 30;
void loop_servo(void) {
  int systick_ms_bak = 0;
  if (millis() - systick_ms_bak >= 20) {
    systick_ms_bak = millis();
    for (servo_index = 0; servo_index < SERVO_NUM; servo_index++) {
      if (servo_data[servo_index].inc != 0) {
        if (servo_data[servo_index].aim > 2497) servo_data[servo_index].aim = 2497;
        if (servo_data[servo_index].aim < 500)      servo_data[servo_index].aim = 500;
        if (abs(servo_data[servo_index].aim - servo_data[servo_index].cur) <= abs(servo_data[servo_index].inc + servo_data[servo_index].inc)) {
          servo_data[servo_index].cur = servo_data[servo_index].aim;
          servo_data[servo_index].inc = 0;
        } else {
          servo_data[servo_index].cur += servo_data[servo_index].inc/movingSpeed;
        }
      }
      myservo[servo_index].writeMicroseconds(servo_data[servo_index].cur);
    }
  }
}
To create movements with a series of small moves, I used the same way keyframes are used in animation making. For each move, I declared a value called steps to keep count of the moves. To drive each servo, I call servo_run(servo_index, aim, time) to give the servo a target location. Then I will call loop_servo() to move the servo. However, loop_servo() needs to be called continuous until the servo reaches the destination because each loop only moves the servo by one increment. To achieve that, I used a while loop checking if one of the servos’ inc has reached 0. If so, it means the move has finished, increasing the steps and activating the next step. To streamline the coding, I create a function that does all procedures mentioned above and returns an int that assigns back to steps.
int steps = 1;

servo_run(1, 1500, 6000);
servo_run(2, 1650, 6000);
servo_run(3, 1200, 6000);
closeclaw(1000);
steps = servo_run_loop(steps, 2);
int servo_run_loop(int initialstep, int checkservoID) {
  int steps = initialstep;
  while (steps == initialstep && servo_data[checkservoID].inc != 0 ) {
    loop_servo();
    if (abs(servo_data[checkservoID].inc) <= 0.01) {
      steps ++;
      return steps;
    }
  }
}
Computer Vision
Three parts in computer vision help the robot arm to understand the world. The first part is detecting movements in the frame. Hence, it knows there are “intruders.” The second part is tracking the cube’s location, and the last one is calculating values for each servo, so it can pick up the cube precisely and put it back to its original location.
Detecting movements
I use a PImage to store the current frame for the next frame to compare pixel changes. I also used the average method to smooth the value, so a sudden stop or change would not accidentally trigger the robot.
Tracking the cube
Initially, I modified a color tracking program from Danny Rozin. In the beginning, I click on the cube to tell the program what color to track. And the program goes pixel by pixel, evaluating the distance between the pixel RGB value to the picked RGB value. Then stores the leftMost, rightMost, topMost, and bottomMost value of the item, hence the cube’s location. A drawback is that the color of the cube varies in the lens of a camera from different angles. It is not reliable enough to give accurate location values.

 int leftMost = width+10;                                   // we want to draw a rect around all area of change so
  int topMost = height +10;                                  // we need to look for the most left, top, right and bottom
  int rightMost = -10;                                        // we start with values that are outside of frame, in case we dont finf anything
  int bottomMost = -10;
  int leftMostY = 0;
  int rightMostY = 0;
  int topMostX = 0;
  int bottomMostX = 0;
  video.loadPixels();
  frameToCompare.loadPixels();
  for (int y = 0; y < video.height; y++) {
    for (int x = 0; x < video.width; x++) {
      PxPGetPixel(x, y, video.pixels, width);               // get the RGB of the live video
      int videoR=R;
      int videoG= G;
      int videoB= B;
      float distance = dist(pickedR, pickedG, pickedB, videoR, videoG, videoB);
      if (distance < 40) {
        if (x< leftMost) {
          leftMost = x;                          // if the pixel is within the rectangle of the leftMost,topMost etc.
          leftMostY = y;
        }
        if (x> rightMost) {
          rightMost = x;                        // and if it isn't then increase the rectangle to contain
          rightMostY = y;
        }
        if (y< topMost) {
          topMost = y;
          topMostX = x;
        }
        if (y> bottomMost) {
          bottomMost = y;
          bottomMostX = x;
        }
      }
    }
  }
Then I switched to OpenCV by evaluating the hue value of the frame. When placing a purple cube on the white platform, it has the highest contrast, so I could use the same bounding box finding method to look for the brightness of the OpenCV frame. It gives me far more reliable and accurate location data to use.

opencv.useColor(HSB);
opencv.loadImage(video);
videoframe = opencv.getSnapshot(opencv.getH());
Calculating values
servo0
I need to figure out which angle the arm should rotate to, hence the value for the bottom servo, servo0. I know the leftmost value is 1700 at a 130-degree and the rightmost value is 1200 at 30 degrees. I need to calculate the angle then map it to the value of the servo motor. Here is a sketch of the math I used to calculate the angle d.

From the values of the bounding box, I can calculate the center point of the cube. Then I calculate the distance from the cube’s center to the video frame’s center. By using asin(), I got the degree of the angle d.
float centerPx =leftMost+(rightMost-leftMost)/2;
float centerPy = topMost+(bottomMost-topMost)/2;
float distToCenter = dist(width/2, 0, centerPx, centerPy);
float d = degrees(asin(centerPy/distToCenter));
if (centerPx >360) d = 180-d;
During the test, I found the closer the cube to the robot arm, the less angle the arm should turn. So I also mapped the min and max value of turning angles base on the cube’s distance to the frame center.
int dRangeMin = (int)constrain(map(distToCenter, 65, 370, 1300, 1200), 1200, 1300);
int dRangeMax = (int)constrain(map(distToCenter, 65, 370, 1650, 1700), 1650, 1700);
servo0 = (int)map(d, 30, 130, dRangeMin, dRangeMax);
servo1, servo2, servo3
To calculate for the rest of the servos, I took the suggestion from Pedro. I tested the furthest point the arm can reach and noted the value of each servo, then I experimented the same for the closest point. Then I mapped each value base on the cube’s distance to the center.
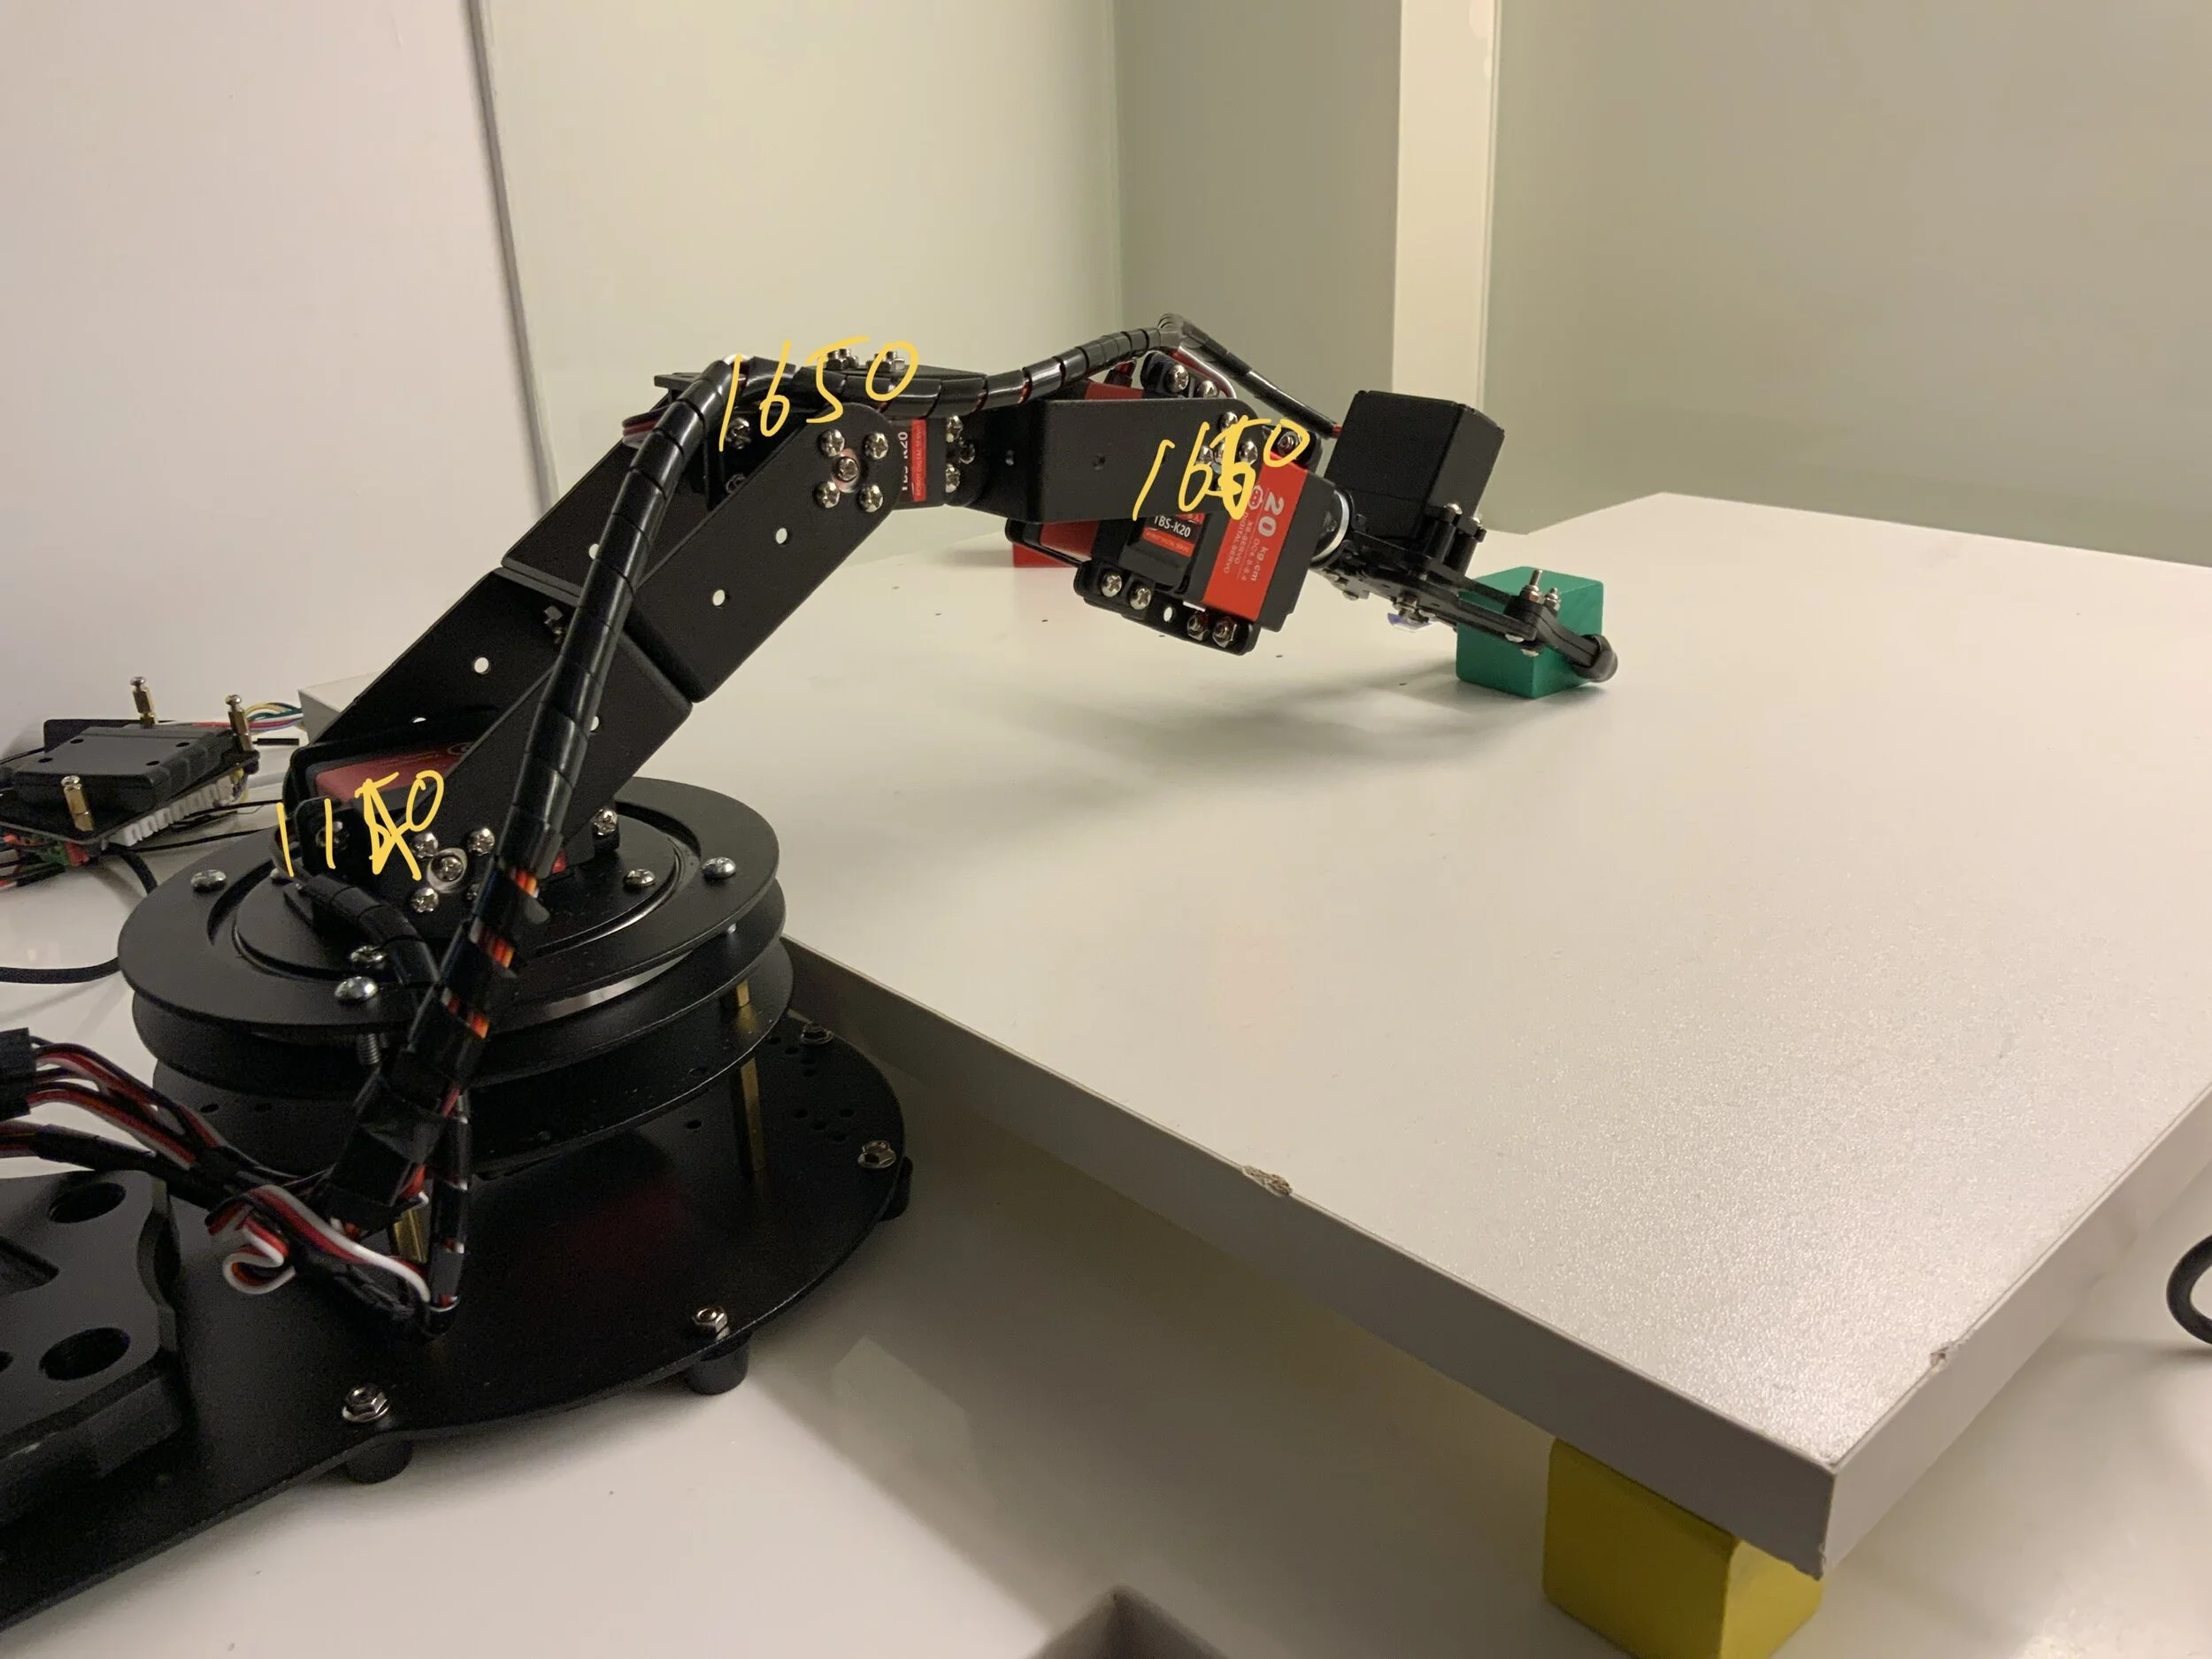
servo1 = (int)constrain(map(distToCenter, 65, 370, 1800, 1140), 1140, 1800);
servo2 = (int)constrain(map(distToCenter, 65, 370, 2300, 1650), 1650, 2300);
servo3 = (int)constrain(map(distToCenter, 65, 370, 2000, 1660), 1660, 2000);
To save the console window, I display all the info on the frame. It is easier for me to keep track of each piece of information too.
Movements
In creating different movements, I acted with my hand and wanted to give this machine-like robot a sense of nature-like motion. Though most of the joints are all on the same rotation plane, I tried to create waving actions to make each move more natural. By adding pause and changing moving speed, I was able to add a bit more emotion to this robot as well. One of my favorite moves is the smashing one; it uses the cube to bang on the platform to create sound, which adds another layer of richness. Stretching was inspired by Pedro's suggestion to add motions when the robot is in its idle state. I used the claw to mimic the arm-stretching we do all the time.
Modes
There are three modes for this robot: Active Mode, Crazy Mode, and Bored Mode.
There are multiple data stored to determine each mode. The program keeps track of how many times it has moved the block, how much time it has been waiting, the level of craziness, last time it moved. The program also has various states that help determine the mode and handInFrame, handWasInFrame, robotGetReady, robotWaiting, robotMoving, robotWantsToMove, and robotBored.
Here is the code that shows how each counter and stated are stored or used.
if (aveCountChange > 1000.0 && robotWaiting) {
handInFrame = true;
handWasInFrame = false;
robotGetReady = true;
pickupInfo = null;
} else {
handInFrame = false;
handWasInFrame = true;
pickupInfo = null;
}
//Getting ready pick up data
if (handWasInFrame & robotGetReady & robotWaiting) {
pickupInfo = "1, " + servo0 + ", " + servo1 + ", " + servo2 + ", " + servo3;
robotGetReady = false;
}

//Enter Crazy Mode
if (movingBackCounter > 10) {
robotWantsToMove = false;
}

//Enter Active Mode
if (robotWaitingTimeCounter > 600 ) {
robotWantsToMove = true;
movingBackCounter = 0;
crazyLevel = 0;
}

//Enter Bored Mode
if (robotWaitingTimeCounter > 2000 ) {
robotBored = true;
}
Serial Communication
I’m using handshake to avoid too much data exchanging between Arduino and Processing.
On the Arduino side, it sends “waiting” when there’s no action going on and asking for data. When there’s data coming in from Processing. It uses parseInt to read information one by one. The first int tells which mode, and the following ints tell the robot to activate which movement from its movements list. As soon as Arduino gets the first int, it sends “Moving” to Processing, so Processing can pause on sending more data. Arduino sends a “Done” to Processing at the end of each move, so Processing can record the frameCount of the move. Lastly, Arduino sends “waiting” so Processing can start sending data if needed.
if (Serial.available() > 0) {
fromSerial = Serial.parseInt();

if (fromSerial == 1) {
Serial.println("Moving");
int servo00 = Serial.parseInt();
int servo01 = Serial.parseInt();
int servo02 = Serial.parseInt();
int servo03 = Serial.parseInt();

pickup(servo00, servo01, servo02, servo03);
delay(500);
dropdown(1500);
Serial.println("Done");
Serial.println("waiting");
}
 //Crazy Mode
 else if (fromSerial == 2) {
Serial.println("Moving");
fromSerial = Serial.parseInt();

if (fromSerial == 0) {
clawshaking();
} else if (fromSerial == 1) {
smashing();
}
else if ( fromSerial == 2) {
pickup(1501, 1140, 1650, 1660);
frontback_shake();
dropdown(1500);
} else if ( fromSerial == 3) {
fixing();
}
Serial.println("Done");
Serial.println("waiting");
}

//bored
else if (fromSerial == 3) {
Serial.println("Moving");
fromSerial = Serial.parseInt();

if (fromSerial == 0) {
stretching();
} else if (fromSerial == 1) {
swiping();
} else if ( fromSerial == 2) {
fixing();
}
Serial.println("Done");
Serial.println("waiting");
}
delay(50);
}
else {
Serial.println("waiting"); //send back a hello world
delay(50);
}

}
On the Processing side. What data to send is determined on multiple booleans that defined states of the robot or the platform. It compiles data into a string and sends the string to Arduino to process.
void serialEvent(Serial myPort) {
  // read the serial buffer:
  val = myPort.readStringUntil('\n');


  //make sure our data isn't empty before continuing
  if (val != null) {
    //trim whitespace and formatting characters (like carriage return)
    val = trim(val);
    //print("Trim done: ");
    println(val);

    //look for our 'Z' string to start the handshake
    //if it's there, clear the buffer, and send a request for data
    if (firstContact == false) {
      if (val.equals("Z")) {
        myPort.clear();
        firstContact = true;
        myPort.write("Z");
        println("contact");
      }
    } else { //if we've already established contact, keep getting and parsing data


      if (val.equals("waiting")) {
        robotWaitingTimeCounter++;

        //Buffer time for CV and robot to get ready
        if ((frameCount - lastMovedFrameCount) > 50 ) {
          robotWaiting = true;
          robotMoving = false;
        }

        //Sending pick up location if robots still willing to pick
        if (pickupInfo != null && robotWantsToMove ) {
          println("sending data");
          robotBored = false;
          myPort.write(pickupInfo);
          robotWaitingTimeCounter = 0;
          movingBackCounter ++;
          print("myport wrote: ");
          println(pickupInfo);
        }
        // Robot tired of moving
        if (!robotWantsToMove && countChangePixels >100 && robotWaiting) {
          println("P_shake");
          robotBored = false;
          if (crazyLevel < 4) {
            String strMode = "2, " + crazyLevel;
            crazyLevel ++;
            myPort.write(strMode);
            print("myport wrote: ");
            println(strMode);
          } else {
            int crazyMode = int(random(3.99));
            String strMode = "2, " + crazyMode;
            myPort.write(strMode);
            print("myport wrote: ");
            println(strMode);
          }
          robotWaitingTimeCounter = 0;
        }
        //Robot Bored
        if (robotBored && (frameCount - lastMovedFrameCount) > 500) {
          println("P_bored");
          int boredMode = int(random(2.99));
          String strMode = "3, " + boredMode;
          myPort.write(strMode);
          print("myport wrote: ");
          println(strMode);
        }
      }

      //Telling Processing robot is moving, no data sending
      if (val.equals("Moving")) {
        println("P-Robot moving");
        robotWaiting = false;
        robotMoving = true;
        robotWaitingTimeCounter = 0;

      }
      //Recording last move done time
      if (val.equals("Done")) {
        println("P-Robot moving");
        lastMovedFrameCount = frameCount;
      }
    }
  }
}